Now that your have set up a proper ODBC connection to SQL (if not, click How to Connect to SQL from Excel), you are ready to create your first SQL report in Excel. Once you get this first one under your belt, you’ll find how easy it is to get up to the moment information from SQL… with no more exporting data with CSV files!
We will be using Excel 365, but we have been doing this with Excel since Excel 2007. The functions and process are the same for the various versions, however, you may notice slight changes in the ribbons over time. Please… don’t let that slow you down!

Let’s start with a clean spreadsheet. Open Excel and then click “Get Data”, “From Other Sources”, “From Microsoft Query”. We prefer and always use Microsoft Query to create reports. Occasionally we may need to do some advanced editing of a report, but that should NOT be required for a vast majority of your reports… especially for beginners and even power users.
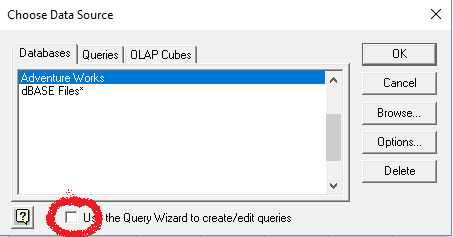 Next you need select your data source. If you followed the steps in the article How to Connect to SQL from Excel, then you should see “Adventure Works” in the list. We strongly recommend you “unclick” the box to “Use the Query Wizard to create/edit queries”. Feel free to check it out and play of desired, but we do not use it here.
Double click “Adventure Works” and the window for MS Query will open.

You will see a window within MS Query to “Add Tables”. You can add one or more tables for the report, and we will discuss using multiple tables in in other articles. You also have the ability to select the “owner” of the data. For techies, this is the database “schema”. For non-techies, this is just a grouping of the tables put in place by your database developer. It is just a mechanism for organization!
For our example we will use the owner of “Sales”, and the the table “SalesOrderHeader”.

Tough it is not necessary to create your first SQL report in Excel, we like to expand the box of the table details to be a bit more visible. Since this is a small demonstration database, we want to see all the fields (or columns) of the table and view all the details. If this were a real database, you would be well served to know a bit more about your data… this is where IT can be a great partner. If you select all the data of a large table, it could take a bit of time and may not even be useful. For our purposes, this just starts to get you thinking about the information available.
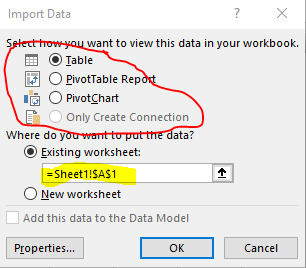
Close this window by clicking the “X” in the top right corner, and you’ll be returned to Excel. You’ll see another window with some important options.
- You can create a “Table” in Excel, start a Pivot Table or even a Pivot Chart! We will discuss the various options later, for now just leave the defaut of “Table”.
- You need to indicate where to place your table. Normally this is in cell A1 of the current sheet, but you can place this anywhere. For now, the default location is best.

Click “OK” and… viola! You have your first report in Excel! While this is in no way a polished or usable report (you have to read and digest everything), this is the initial building block… your first step… in creating more useful information in Excel. And guess what, no exporting from SQL, no importing of a CSV file… data pulled directly from SQL into Excel.
You did it! You were able to create your first SQL report in Excel.
Now onto some Excel Table Best Practices.